ProGuard pro-tip: Don’t use ProGuard’s “-include” with Gradle builds

I like to organize my ProGuard rules by breaking them up into separate files, grouped by what they’re acting on — my data model, third-party libs, etc.

It’s tempting to reference one main ProGuard file from your build.gradle, and then put ‘-include’ entries in the main file to point to the rest, but there’s a problem with this. If you make a change in one of the included files, it won’t be picked up until you do a clean build.

The reason for this is Gradle’s model of inputs and outputs for tasks.  Gradle is really smart about avoiding unnecessary work, so if none of the inputs for a task have changed, then Gradle won’t rerun the task.  If you list one main ProGuard file in your build.gradle and include the rest from there, Gradle only sees the main file as an input.  So if you make changes in an included file, Gradle doesn’t think anything changed.

The easy way I’ve found to work around this is to put all of my ProGuard rules into a directory, and include them all in your build.gradle with this snippet:

Distinguishing between the different ProGuard “-keep” directives

If you search for ProGuard rules for a Java or Android library, you’ll see a lot of answers on StackOverflow that tell you to do something like this:

-keep class com.foo.library.** { *; } 

That advice is really bad, and you should never do it.  First, it’s overly broad — that double-asterisk in the package means every class under every package under that top-level package; and the asterisk inside the curly braces applies to every member (variables, methods, and constants) inside those class.  That is, it applies to all code in the library.  If you use that rule, Jake Wharton is going to come yell at you:

Second, and what this post is about, is the beginning of the directive, that “-keep”.  You almost never want to use -keep; if you do need a ProGuard rule, you usually want one of the more specific variants below.  But it always takes me a minute with the ProGuard manual to figure out which one of those variants applies to my case, so I made some tables for quick visual reference.  (Quick aside: the ProGuard manual is very useful and I highly recommend you look through it.)

No rule

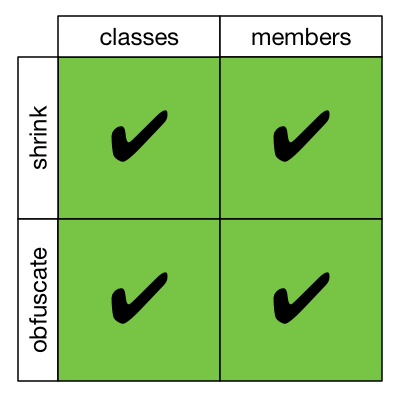
To get our bearings, let’s look at the default.  If you don’t specify a keep directive of any kind, then ProGuard is going to do it’s normal thing — it’s going to both shrink (i.e. remove unused code) and obfuscate (i.e. rename things) both classes and class members.

-keep

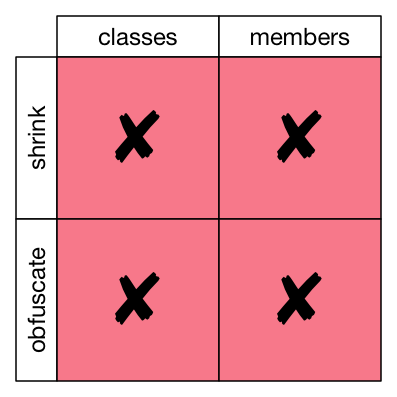
See, this is why I said you should almost never use -keep.  -keep disables all of ProGuard’s goodness.  No shrinking, no obfuscation; not for classes, not for members.  In real use cases, you can let ProGuard do at least some of it’s work.  Even if your variables are accessed by reflection, you could remove and rename unused classes, for example.  So let’s look through the more specific -keep variants.

-keepclassmembers

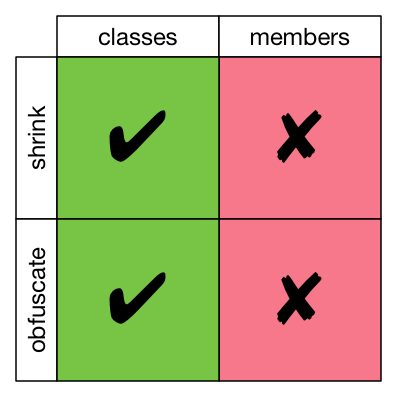
This protects only the members of the class from shrinking and obfuscation.  That is, if a class is unused, it will be removed.  If the class is used, the class will be kept but renamed.  But inside any class that is kept around, all of its members will be there, and they will have their original names.

-keepnames

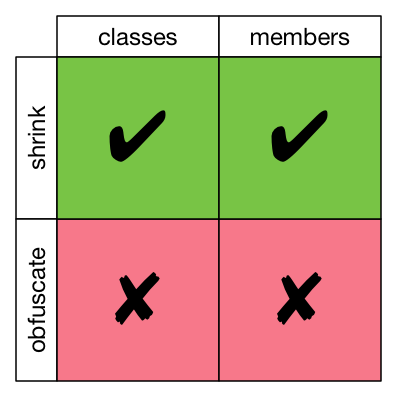
This allows shrinking for classes and members, but not obfuscation.  That is, any unused code is going to get removed.  But the code that is kept will keep its original names.

-keepclassmembernames

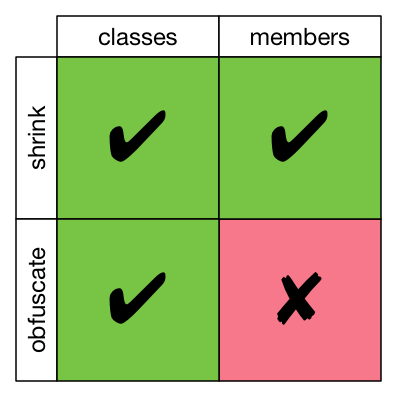
This is the most permissive keep directive; it lets ProGuard do almost all of its work.  Unused classes are removed, the remaining classes are renamed, unused members of those classes are removed, but then the remaining members keep their original names.

-keepclasseswithmembers

This one doesn’t get a table, because it’s the same as -keep.  The difference is that it only applies to classes who have all of the members in the class specification.

-keepclasseswithmembernames

Similarly, this rule is the same as -keepnames.  The difference, again, is that it only applies to classes who have all of the members in the class specification.

Conclusion

You want to let ProGuard do as much work as possible, so pick the directive that has the fewest red X blocks above, while still meeting your need.

Getting Started with Android Things

Android ThingsI’m giving a presentation tonight at the Charlotte Android Developer / GDG meetup about Getting Started with Android Things.

Update: here’s the video!

Here are the slides.

And some relevant links:

An Android runtime permissions corner case

I recently got curious about what happens to the runtime permissions state when the user revokes or grants a permission using the OS Settings app, rather than allowing or denying in the dialog prompt that an app can show to request permission.

For background, there are two parts to the state that an app can query at any time:

The question I got curious about was this: what happens when the user revokes a permission in the settings app?  If they had previously chosen “don’t ask again”, but then later grant the permission in settings, then revoke the permission again, can you prompt for the permission?

I made a simple app to try it out, and came up with this for the possible states:The answer is that if the user revokes a permission in settings, all of that history essentially goes away.  You’re left in the same state as if you had asked for permission and the user had denied it once, but you can ask again.

I realize this isn’t the sort of thing that’s going to happen in the course of normal usage; I don’t expect most users to ever toggle those permissions from the settings app.  But I think it’s worth understanding how it works.

Certificate Pinning with OkHttp

Now that you know how to run a man-in-the-middle attack, you want to know how to prevent one. The way we’re going to do that is by “pinning” your certificate.

How does it work?

HTTPS begins its connection by verifying the certificate that’s being presented by the server. It checks all of the signatures in the chain of trust, and that the root certificate authority (CA) is any one of the trusted roots installed in your OS. What we do with pinning is to add one more check — the client checks that one of the certificates in the chain of trust is exactly the certificate it’s expecting.

The man-in-the-middle attack that we ran relied on installing a bogus trusted root CA in the operating system, which mitmproxy used to create a bogus chain of trust. But if you’ve pinning the real certificate, this attack fails because mitmproxy can’t issue a bogus certificate with your server’s real key.

OK let’s do it

OkHttp3

    1. Set up a certificate pinner on your OkHttpClient with a dummy signature for your domain:
    2. Run with that certificate pinner, you’ll get an SSLPeerUnverifiedException showing the expected hash (your bogus one) and the actual hashes for each certificate in the chain.certificate-pinning-failure
    3. Replace the bogus hash in your code with the hash of the certificate you want to pin, and run it again.
    4. Now try running with mitmproxy again to verify that it fails.
OkHttp2
  1. Same steps as above, but here’s the code for your dummy pinner:

Let’s talk about some of the things you need to think about:

Renewals – certificates aren’t forever

When you look at any of the certificates in your chain, you’ll notice that they all have expiration dates. Sometime before that expiration date, your system administrator is (hopefully) going to renew that certificate – that is, they’ll get a new certificate for your server. If you’re not planning ahead and talking to your sysadmin, this could break your connections.

Pin the whole certificate or just the public key?

If you were manually verifying the certificate, you might think of hashing the whole certificate and ensuring that matches your expected value. That’s going to be brittle, because if the certificate gets renewed and you’re pinning to the entire certificate, your pin is going to break.

So in the example above, OkHttp is pinning the public key info, not the whole certificate. So if the certificate gets renewed and the new certificate has the same public key, your pin should continue to work fine.

Which certificate in the chain to pin?

You can pin any of the certificates in your chain of trust – the root CA, and intermediate CA, or your server’s certificate. Let’s look at some pros and cons of each.

If you pin one of the CA certificates, then as long as your server gets a new certificate from the same CA, it doesn’t matter if your certificates public key changes. This is potentially useful if your server is hosted by somebody else and you might change providers. The downside is you’re locked into that CA. You have to get your renewed certificate from the same CA, and their public key has to be unchanged.

On the other hand, if you pin your server’s certificate, then you can get your renewed certificate from any CA you want, as long as your server’s public key is unchanged.

Bottom line: talk to your system administrator to ensure that your pinning won’t break when they renew the certificate.

UPDATE — see also:

How, and Why, to run a Man-In-The-Middle Attack on Your Own App

Wait, what? Why would I want to do that?

Lots of good reasons:

  • If you want to see the actual traffic you’re sending over the network, for debugging purposes.
  • See what third-party libraries might be sending, and how they’re sending it.
  • Demonstrating how trivial it is to do so, as a pre-condition for mitigating it.
But I’m using HTTPS, so I can’t MITM my traffic.

id45(side note: any day I can use an Independence Day GIF is a good day)

Yes, by using HTTPS, a random third-party can’t decrypt your payloads.

https-side-by-side-marked

But while HTTPS protects you from a third-party listening in to your traffic, the endpoints are still vulnerable.

alice-bob-carol-marked

I don’t want to get sidetracked with a detailed explanation of how HTTPS protects you, so here’s the short version: First, you verify the server’s identity using the Public Key Infrastructure. The server presents a certificate saying “I am example.com”. That certificate has been signed by a trusted third-party, called a Root Certificate Authority (CA). That signature says “I am Trusted CA, Inc. and that really is example.com”. Your OS has a couple hundred root CA certificates installed, so it can be sure that it’s really Trusted CA, Inc. that signed the certificate. (In reality, the server’s certificate has actually been signed by an intermediary CA, which was in turn signed by the root CA. We call this the chain of trust).

After you’ve established the server’s identity, you exchange public keys, and can encrypt messages to each other that can only be decrypted by the known party – no third party can listen in to your encrypted messages and see what you’re saying.

Since we can’t decrypt your HTTPS payloads, we’re going to attack by making a fake root CA and installing it as one of the device’s trusted roots.

Isn’t that hard?

Nope. We’re going to install a tool that handles it all for you.

Step 1. Install mitmproxy on your dev machine.

Step 2. Run mitmproxy on your dev machine. Down in the bottom-right corner, it’ll tell you what port it’s running on. Also, make note of your dev machine’s IP address.

Step 3. Connect your Android (or iOS or whatever else) device to the same network as your dev machine, and in your network settings, set your proxy to your dev machine’s IP address and the port that mitmproxy is running on. The exact details of how to do this vary by OS version, so’ll have to google that for yourself.

Step 4. On your target device, open a browser and go to (mitm.it) This magic domain will help you install mitmproxy’s certificate as a trusted root CA on your device.

Step 5. Run your app, and watch mitmproxy dump all of your traffic.

mitm-https-cleartext-marked

So what do I do now?

You pin your certificates. I’ll follow up with another blog post soon to help you do that (edit: follow-up post on certificate pinning is up). (Good news: it’s pretty easy)

Also, you learn a little more about HTTPS. Knowledge is power.

Self-Signed Certificates with OkHttp – the Right Way

Your sysadmin comes to you and says “hey, let’s quit using the developmestruction environment, I set up this new test server we can test with instead.” Awesome.  This is definitely a good thing for your development.

So you switch the URL your app is calling, but now you’re getting see this:

Screen Shot 2016-06-05 at 7.02.02 PM

Why can’t you connect?  Well, SSL certs cost time and money, so a lot of times in internal test and development environments you’ll see self-signed certificates.  By default, OkHttp isn’t going to trust those, since they aren’t signed by a known, trusted Certificate Authority (CA).

At this point, you may find some StackOverflow answers suggesting that you make a dummy TrustManager that just blindly accepts any SSL certificate.  Don’t do that.  You may as well disable SSL at that point, because anybody can run a man-in-the-middle attack to read and/or manipulate your traffic.  Seriously, just don’t.  Even for your test environment.  

The good news is, it’s just as easy to fix the right way by adding trust for your self-signed certificate.  Here’s all it takes:

Step 1: Download the .cer file

1-chrome-broken-lock

Open the URL in Chrome.  You’ll see the broken lock icon in the address bar; click it. Your goal is to drag the certificate to somplace you can work with it; Chrome will give you a .cer file.  (screenshots are small, click to embiggen)

1b-chrome-not-private1c-connection-detail

1d-cert

Step 2: convert to .pem, using this in your terminal (and maybe spend a minute with “man openssl” to see what’s up here – we’re converting from one certificate file format to another)

openssl x509 -in server.cer -inform DER -out server.pem -outform PEM

Step 3: Drop the .pem in your app’s assets folder

Step 4a: Here’s how to add that custom cert to OkHttp3

Step 4b: OkHttp2 version

Run it again, and you’re good to go.

Android dev tip: Custom fonts for TextView

So your designer friend is back and she drops you a hot new design.  Due to a branding declaration from a highly-paid branding consultant, your whole app needs to use this new typeface.

Screen Shot 2016-05-24 at 8.01.33 AMOk, probably not the whole app, just a few titles.

Here’s the catch though — Android doesn’t ship with hot new typefaces like Uptown Sans, so you have to figure out how to convince TextView to render with it.  The goal is to make setting the font as easy as every other attribute on a TextView.  

before-customYeah, lint is having none of that; see the highlight?  And it’s just going to be ignored by TextView.  But hang with me for a couple minutes and you’ll get there.

Step 1. Copy your .otf into your assets folder

assets-folderStep 2. Copy this class into your project… Build… Breathe… we’re almost there…

We don’t want to go to the effort of rewriting TextView from scratch, it gives us so much.  We just want it to accept custom fonts from our layout XML.  So we extend.  Embrace, extend… embiggen? It’s something like that, I’m pretty sure.  Enfranchise?  Embark?  Empower?  Yeah, empower, that has to be it.

Step 3. You need to add this to your attrs.xml, or create res/values/attrs.xml with this if you don’t have one already

Step 4. Back to the layout file – but with two adjustments

layout

That’s it.  Build & run, and you’re done.

Extra Credit.

But wait, you say.  DRY that up, right?  Yeah, let’s do.  You don’t want to have the type in the whole path to the font in every layout file, isn’t that what auto-complete is for?  So let’s kick it up a notch.  Now I want two weights of that typeface, and the ability to easily reference one or the other.

We need to adjust your attribute to be an enum, instead of a string.  Here’s the new version:

Then in the custom TextView, we can dereference those.

And we’re there.  See?  Not that hard.

Yeah, so…

  • “There are other ways to do this!”
    • Agreed.  There are others like it, but this one is mine.  Tweet @ me with better solutions.
  • “Why not just use a TextView in the XML and use setTypeface() to change the typeface?”
    • You totally could.  I prefer to keep layout stuff in my layout files for code architecture reasons.


What did I miss?  Seriously, tweet @ me.  Half of the reason I wrote this article was because this feels like way too much work, so if you’ve got a better solution that I overlooked, I’d love to hear about it.

Android dev tip: Replace PNG assets with XML drawables

tl;dr: You’ll save a lot of memory.

The best way to fix OutOfMemoryException problems in Android is never to have them, so it’s important to be proactive about limiting the amount of memory that your app uses.  Sometimes this means bossing around your designers.  Let me explain why with a story…

button

Your designer hands you a design with a PNG that looks like this (well, hopefully your designer hands you things that look nicer than this, since I have no idea what I’m doing, but let’s ignore that for a minute, shall we?  K thx.)

It’s just a little thing, just 300×100 dp.  So you lay out the screen, run the app and everything is hunky-dory, until you look at the Memory Monitor in Android Studio and notice your app’s memory usage just jumped by about 1 MB.

png-mem-jump

What the hell just happened?

That’s no good.  Surely adding a simple button can’t cost a megabyte of memory.

finder-smallYou look at the PNG you just added, but it’s only 10 KB.  That can’t be the problem, can it?  Turns out, it is.  What you’re looking at in Finder is the compressed image file, but Android doesn’t keep the file compressed when it loads.  It renders your PNG to a Bitmap, which is the most un-compressed way to store an image.  It’s just a big matrix of pixels with a color value for each pixel.  By default, Android uses the ARGB_8888 format which uses 4 bytes per pixel.  And oh yeah, we’re looking at an XXHDPI device, so our 300dp width is actually 900 pixels.  That means our “little” 900×300 pixel image is using 1,080,000 bytes (1.03 MB) for its Bitmap.  

mem-dump-byte-array

Yeah, that really sucks.

So are you stuck with the sad fact that you’re now 1 MB closer to exploding your app by running out of memory?  Do you DM your designer on Slack and tell them they’re a bad person and they’re killing the app?  (Pro-tip: don’t ever do that)

There’s a better way.  You can draw the same thing to the screen using an XML Drawable and a Button.

Now let’s check that memory usage again.

xml-tiny-jumpOur XML-based drawable is using 504 bytes in memory.  Oh that’s nice.

Moral of the Story

Now obviously this won’t work for every asset; once you get past basic shapes, you’ll still need assets for anything complex.  But by being vigilant, and replacing simple assets with XML drawables, you delay the time when you’ll face the inevitable OutOfMemoryException.

4865622

Android InputTypes and Keyboards

When reading input from an Android user with an EditText, you have a simple way to help that user out by setting the InputType.  If you need the user to input a number, for example, you set the number InputType, and the user will automatically key a numeric keypad instead of the full QWERTY.  This saves the user a little bit of time and mental energy, and helps avoid mistakes with input.

Beyond just text and numbers, though, are a range of options that produce very subtle changes in the keyboard that Android brings up.  Below I explore which options bring up which keypad by default.

Screenshot_2015-04-10-12-04-55
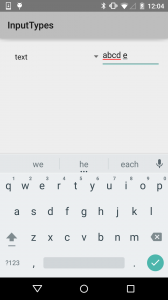
First, the standard keyboard, which covers a lot of the input types.
TYPE_CLASS_TEXT
TYPE_TEXT_VARIATION_EMAIL_SUBJECT
TYPE_TEXT_VARIATION_LONG_MESSAGE
TYPE_TEXT_VARIATION_PERSON_NAME
TYPE_TEXT_VARIATION_POSTAL_ADDRESS
TYPE_TEXT_VARIATION_PASSWORD
TYPE_TEXT_VARIATION_VISIBLE_PASSWORD
TYPE_TEXT_VARIATION_WEB_EDIT_TEXT
TYPE_TEXT_VARIATION_FILTER
TYPE_TEXT_VARIATION_PHONETIC
TYPE_TEXT_VARIATION_WEB_PASSWORD

Screenshot_2015-04-10-12-05-02
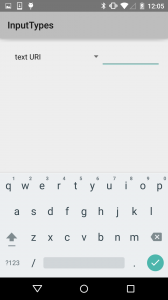
For our first subtle variation, the URI keyboard replaces the comma with a slash.
TYPE_TEXT_VARIATION_URI

Screenshot_2015-04-10-12-05-07
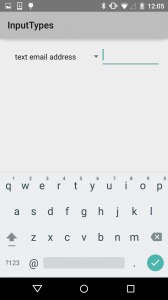
Next, the email keyboard replaces the comma with an @.
TYPE_TEXT_VARIATION_EMAIL_ADDRESS
TYPE_TEXT_VARIATION_WEB_EMAIL_ADDRESS

Screenshot_2015-04-10-12-05-23
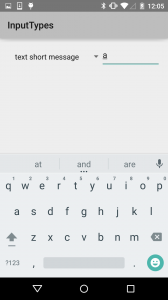
The short message keyboard replaces the enter key with emoji access.
TYPE_TEXT_VARIATION_SHORT_MESSAGE

Screenshot_2015-04-10-12-06-22
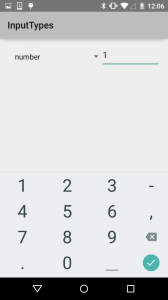
The other main keyboard is for numeric entry.
TYPE_CLASS_NUMBER
TYPE_NUMBER_FLAG_DECIMAL
TYPE_NUMBER_FLAG_SIGNED

Screenshot_2015-04-10-12-06-40
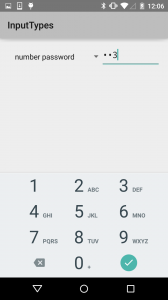
The number password variant reduces the available symbols and focuses just on the numbers.
TYPE_NUMBER_VARIATION_PASSWORD

Screenshot_2015-04-10-12-06-56
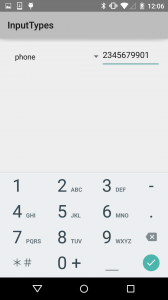
The phone class adds some symbols common for phone number formatting, plus star & hash.
TYPE_CLASS_PHONE

Screenshot_2015-04-10-12-07-17
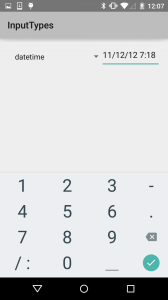
The date/time class gives you a slash and colon for formatting.
TYPE_CLASS_DATETIME

Screenshot_2015-04-10-12-07-23
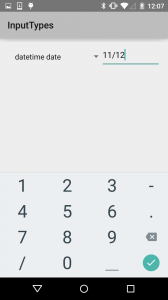
The date variant only allows for a slash.
TYPE_DATETIME_VARIATION_DATE

Screenshot_2015-04-10-12-07-29
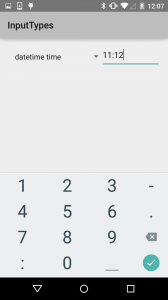
The time variant only allows a colon.
TYPE_DATETIME_VARIATION_TIME